Hello friends!
Please read through the instructions carefully before you start making your own Fox pincushion
Download Free Fox pattern here
LIST OF SUPPLIES:
- Beige or White felt 6 x 6 inch -15 X 15 cm (wool felt recommended)
- Dark orange (or whatever color you like) felt – 9 x 12inch -23 X 30 cm (wool felt recommended)
- Scrap of Brown (or whatever color you like) felt for the ears 2 x 2 inch – 5 x 5 cm
- Stuffing (anti-allergy polyfill, wool, etc.)
- Pink colored pencil (pastel) for cheeks
- Black embroidery thread
- White or beige embroidery thread
SEWING SUPPLIES:
- Thread to match fabrics
- Needles for embroidery
- Dressmaker’s scissors
- Pins
- Needles for hand sewing
- Stuffing tools such as a wooden spoon, stinging needle or chopstick
- Disappearing ink marker (heat sensitive) and chalk
- Ruler
- Iron
1. DRAWING AND TAILORING
- Print and cut out all paper pattern pieces.
- At each pattern piece, you have the exact number of how many pieces you need to cut out from the fabric. Seams are included.
- Place pattern pieces onto the felt fabric so that the arrow is placed in the same direction-downwards.
- Trace pattern pieces onto the wrong side of the open felt with your disappearing ink marker. In case you make a mistake, you only need to iron it for the ink to disappear.

NOTE: You need to draw each mark from a pattern, this will be your guide for connecting parts when sewing.
2. SEWING
Please NOTE: Fox pincushion is embroidered and stitched all by hand. For sewing fox, we are going to use regular sewing thread doubled (or you can use strong upholstery thread knotted at one end). And, for embroidering facial features, we are going to use BLACK embroidery thread. Use max. 20-25-inch-long thread.
- Stitches should be small. The seam allowance is about 1/6 inch. Always keep your stitches and the space between them the same length. Be consistent with your sewing tension.
BACK STITCH Video tutorial : https://youtu.be/ZrPCtNS913Q
SATIN STITCH Video tutorial: https://youtu.be/VsLODYfs0CI
STRAIGHT STITCH Video tutorial h: https://youtu.be/hhmP2g9KDxA
LADDER STITCH Video tutorial : https://youtu.be/Vp24VoZ1zeg
BLANKET STITCH Video tutorial: https://youtu.be/rSrXY-At1ws
WHIPPED BACK STITCH Video tutorial: https://youtu.be/YZi0F2kWx34
NOTE: be careful not to pull the thread too tight.
- SEWING FOREHEAD TO THE HEAD -
- Position forehead (B) piece onto face (A), center notches should match. Pin and sew with Back stitch and matching sewing thread knotted at one end.
- Sew only at the face (a to b), you will sew around the head later when connecting to the back of the head.

- Next, we are going to draw the face but we will embroider it later. You can transfer facial features in two ways: 1. if you can see through the felt, and 2. if you can’t see through.
- TRANSFER FACIAL FEATURES 1.way -
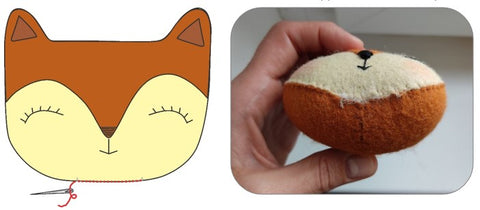
- After sewing the Front Head part, we are going to draw the face of our fox.
- To see the facial features more easily, tape the paper pattern and sewn head part onto a window (or you can use light box or computer screen as well). It’s much more visible and faster.
- Position sewed head part onto Face pattern piece and trace the facial features onto the fabric with your disappearing ink marker.
- Make sure to fit all the notches and the face opening.

- TRANSFER FACIAL FEATURES 2.way -
- Align fabric Head front and paper Head front pattern together. All the notches must match.
- Mark the place for the facial features using your needle pin and disappearing ink marker (as shown in the photo below).

- Use the same transferring method for the inner ears and forehead hairs placement.
- HEAD BACK -
- Place the two pieces of the head back (C) wrong side facing. Pin them and sew along the edge of the head back piece only using Blanket Stitch and matching sewing thread - doubled. We are sewing on the right side of the fabric.

- SEWING HEAD FRONT AND HEAD BACK TOGETHER –
- Now, when you have all parts prepared, align the front and back of the head together. First, pin the top and the bottom of the head by the marks, and then arrange and pin all the fabric from the back of the head to fit the front. All the marks shall match, wrong sides facing (you are sewing on the right side).

- You are going to use two colors of sewing thread for the head. At the beige (white) part of the head use the beige (white) thread and for the orange use matching sewing thread.
- Double the thread. If you are using upholstery thread then knot one end only.
- You will start and end your sewing at the bottom of the face. When you come to the end of sewing, don’t cut the thread yet, you will use it to close the head after stuffing.
- Stitch the head shapes together using a Blanket Stitch, sewing through all layers of felt. You have to keep in mind that the front and back need to look neat.
- You are sewing on the front side of the face.

- Stuff the head to be firm. Keep in mind to push the stuffing down from both the front and backside to distribute stuffing evenly. Make sure you do not have the knobs because it won't look nice. Use your chopstick to help you push the stuffing in.

- Next, position the inner ears in place and Stitch using Back stitch and matching thread.

3. FACE EMBROIDERY

- Take the doll needle threaded with approx. 10-inch long thread. Use 2 strands of black embroidery thread knotted at one end for the nose, nose line, mouth and eyelashes. For the eyelid use 4 strands of thread knotted at one end (I use black DMC #310). For the hairs at the forehead use all 6 strands of beige embroidery thread knotted at one end (I use beige DMC #739).
- First, push the needle through the head opening, aim to come out at the mark for the nose.
- As you pull the thread through, the knot will catch in the stuffing. And when you want to finish come out of the opening in the fox head. Tie a few knots and cut the excess thread off. The stuffing will hold the thread in place.

TIP: Always keep your stitches the same length, and be consistent with your sewing tension. Use a longer needle to push the thread through the head opening and before embroidering switch to a regular-sized needle.
- Using Satin stitch embroider the nose working from left to right, working neatly and evenly and keeping your stitches close together. Don’t pull the thread too tight or you’ll bunch up the nose.

- When you reach the end at the nose, make one straight stitch from the outside for the nose line (to point B)

- Go from B through the stuffing to point C. Then take your needle from the outside to the point B, and from point B through the stuffing to point D.

- Go from point D from the outside to the point B, and from point B go through the stuffing to the outside of the eye and make one straight stitch for each eyelash

- After you finish the eyelashes at one eye, go through the stuffing to the other eye and repeat the process.

- After you finish with eyelashes, go through the stuffing and out. Make a few knots and trim the excess thread off.
- Next, we are going to outline the eyelid using Backstitch (from A to B), and 4 strands of black embroidery thread.
- When you back stitch from A to B, go back from B to A using Whipped stitch.

- To add hairs to her forehead, use all 6 strands of beige embroidery thread and Straight stitch.

- When you've done with embroidering facial features, close the opening in the head with the Blanket stitch. Add more stuffing while sewing and stitch it closed. The pincushion needs to have one compact rounded shape when you are finished.
- When you come to the end of sewing, make a knot and hide the thread by popping the knot through the material and out of the fabric. The excess thread should disappear back inside the pincushion.
- And for the last touch at the face, use your orange/pink colored pencil to add some color to her cheeks. (I usually use two shades to blend in better).

4. PINCUSHION BRACELET
- Use your paper pattern to tailor the bracelet (E) and bracelet loop (E1) piece.
- Take your bracelet loop piece (E1) and fold the edges for about 1/4 inches (0.7 cm).
- Position the bracelet loop on the back of the fox pincushion (folded edges down).
- Pin with needles and stitch the upper and bottom of the loop with two rows of Back stitches. Place the rows close together. Use matching thread double knotted, and if you are using upholstery thread knotted at one end.

- Next, measure your wrist and position the Velcro tape on the bracelet piece (E) to each end where the marks are.
- You can stitch the Velcro tape in the place using Back stitches or you can also use your sewing machine. Be careful to match the pair (soft and scratchy side).

- Pull the bracelet piece through the loop and you have your pincushion with bracelet finished.

Download Free Fox pattern here